DIY: How to Fix a Leaky Tap
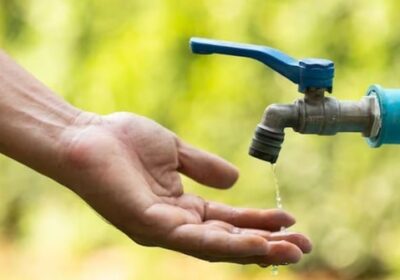
If you’re experiencing a leaky tap, there’s a way to get it fixed without having to pay a plumber. In fact, you can easily repair your tap yourself, using only a few household supplies. With a few simple tips, you’ll have your tap working like new in no time.
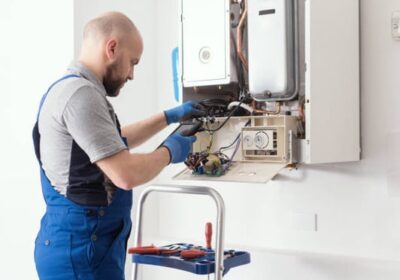
Disassemble the tap
If your tap is leaking, it is best to disassemble the faucet to get to the root of the problem. In most cases, the leak is caused by a seat washer. This is a relatively inexpensive part and should be replaced as soon as possible. You might even want to consider replacing the entire cartridge to fix the leak.
Aside from the seat washer, there are several other component parts of your tap that can be fixed. For instance, a cracked disc inside the cartridge is a common culprit for a dripping faucet. But you may not know how to spot a cracked disc replacement. Luckily, the O-ring on your faucet is cheap and easy to replace.
To repair a leaky tap , you’ll need to remove the handle, handle stem, decorative cap, and valve cartridge. Once the handles are removed, you’ll be able to gain access to the valve cartridge and the O-ring. These parts are usually held in place by a small screw. However, some faucets may have a metal button to hold the screw in place. Use a flathead screwdriver to unscrew the screw.
If your tap is a ball tap , you’ll need to remove the inlet seal, the inlet ball, and the ball. These three components are typically secured with a hex set screw. While the hex set screw can be difficult to unscrew, it’s not impossible.
Other parts of your tap that you’ll need to replace include the O-ring and the rubber seat washer. These can be purchased at your local hardware store. The O-ring should be coated with neutralized heat resistant solvent for optimal performance. It is also a good idea to install a new seat washer, which is usually found on the base of the stem.
Before starting your tap repair project, it’s a good idea to turn off the water. This will prevent damage to the tap and sink. Additionally, you’ll need to plug the drain to prevent small screws from falling into the P-trap. Another helpful tip is to place a cloth over the drain to catch any debris that falls into the drain.
When you’re ready to reassemble your tap , be sure to use the most appropriate tools for the job. Some common tools include an Allen key, a Phillips-head screwdriver, and a wrench. Check the manual for a list of tools and procedures. Also, check the inventory at your local hardware store to be sure you’re getting the right parts.
If you are considering a more sophisticated repair, such as replacing the entire tap , contact your plumber. However, if you are looking to save money, you can try your hand at the tap repair yourself. Take a close look at the schematic and order the parts in a logical manner.
Inspect the O-ring and the washers inside the valve seat
If your tap is starting to leak, it’s time to inspect the O-ring and the washers inside the valve seat. These are the parts that most likely lead to the problem. The o-ring is the shiny little thing that prevents water from leaking out of the handle, while the washers are the parts that actually seal the valve seat to the spout. A leaking valve seat can cause the leak to be visible on your spout or in the sink.
You can fix your leaking tap by replacing the O-ring and the washers. This is a relatively easy job, and you don’t have to call a plumber. However, it is important to make sure that the replacement is the right size and shape for your particular tap .
To replace the O-ring, you should use a tool that will let you loosen the stem and unscrew the nut that holds the ring in place. Using a crescent wrench or adjustable wrench, you should be able to pull the stem out of the body of the tap .
In order to properly replace the O-ring, you should buy a flat washer that fits the ring perfectly. While you are at it, you should coat the surface of the ring with heat-proof plumber’s grease.
When you replace the o-ring, you should also take the time to check the other plumbing components, as well. For instance, if the o-ring isn’t the culprit, you may want to consider replacing the stem, washer, or packing nut. Doing so is often the only way to repair a leaky tap .
Taking care of the O-ring and the washers inside your tap’s valve seat will ensure that the dripping water will stop. But what exactly are these pieces? The o-ring is a small disc that fits on the stem screw. It can be purchased in various sizes, ranging from 3/8 inches to 5/8 inches.
Aside from the O-ring, the best leaky tap trick is to get rid of sediment that builds up on the valve seat. Water sediment often consists of hard water deposits and can corrode the seat. Therefore, you should make sure that you clean the tap regularly, which is an easy task if you have a good quality faucet cleaner.
Another useful trick is to use the valve seat tool. This is a little gadget that you can buy from any hardware store. It fits into the threaded hole at the bottom of the tap body. As you tighten the tool, it presses a rubber washer against the metal valve seat. Unlike an o-ring, you’ll need to turn the tool clockwise to tighten the valve seat.
Finally, while you are at it, you can test the water supply lines in your house to make sure they aren’t leaking. If they aren’t, you should consider hiring a professional plumber.
Clean the aerator
If you have a leaking tap, it is important to clean the aerator. The aerator is often a small device that is located on the end of the faucet. Depending on the type of aerator you have, you may need to remove the aerator from the tap or you may be able to simply replace it. Either way, cleaning the aerator can improve the quality of the water.
Aerators are made of several small parts, including a screen, a washer, and a casing. When the aerator is clogged, it may be difficult to remove all of the parts. This makes it vital that you clean the aerator before you attempt to replace it. Once you have cleaned the aerator, you can use a tool such as a sewing needle or toothpick to clean the holes in the screen.
First, you will need to open the tap . You can do this by turning it in a clockwise direction or you can pull the aerator off with a wrench or pliers. To make sure that you don’t damage the tap, wrap masking tape around the pliers’ jaws.
After you have removed the aerator, you should soak it in vinegar for five minutes. This will dissolve any mineral deposits that have formed. It is important to rinse the aerator thoroughly after the vinegar soak, as some debris will be unable to be washed away.
Next, you can rinse the aerator with running water, as this will help to flush out any loosened debris. If you don’t have access to a running tap, you can place a cloth over the aerator to prevent further damage. Alternatively, you can apply a thin layer of vegetable oil to the threads of the aerator.
If the aerator isn’t clogged, you can clean the aerator with a brush or an old toothbrush. Be careful not to get the toothbrush too close to the aerator’s interior. Otherwise, the bristles can get stuck in the tiny holes in the aerator.
Once you have cleaned the aerator, be sure to screw the parts back on the tap. Make sure to put them in the proper order. For example, if you are replacing an aerator that has a perforated disk, you can reattach it by screwing the disk in first.
Depending on the model of your aerator, you can buy replacement aerators at home improvement stores or plumbing suppliers. Check with the manufacturer of your tap to ensure that you purchase the correct parts.
If you have a tap with an aerator that is hidden, you will need to use a special tool to remove the aerator. Aerators with a specialized key will be available at your local home improvement store. However, this tool can be expensive, so you may want to ask your plumber if it is a good idea to purchase one.